Toyota CH-R Service Manual: Rear Door Opening Trim Weatherstrip
Components
COMPONENTS
ILLUSTRATION

|
*A |
w/o Rear Seat Side Airbag |
*B |
w/ Rear Seat Side Airbag |
|
*1 |
REAR DOOR OPENING TRIM WEATHERSTRIP |
*2 |
REAR DOOR SCUFF PLATE |
Removal
REMOVAL
CAUTION / NOTICE / HINT
HINT:
- Use the same procedure for the RH side and LH side.
- The following procedure is for the LH side.
PROCEDURE
1. REMOVE REAR SEAT ASSEMBLY
Click here
.gif)
2. REMOVE REAR DOOR SCUFF PLATE (w/o Rear Seat Side Airbag)
Click here
3. REMOVE REAR DOOR SCUFF PLATE (w/ Rear Seat Side Airbag)
Click here
4. REMOVE REAR DOOR OPENING TRIM WEATHERSTRIP
|
(a) Remove the rear door opening trim weatherstrip. |
|

Installation
INSTALLATION
CAUTION / NOTICE / HINT
HINT:
- Use the same procedure for the RH side and LH side.
- The following procedure is for the LH side.
PROCEDURE
1. INSTALL REAR DOOR OPENING TRIM WEATHERSTRIP
|
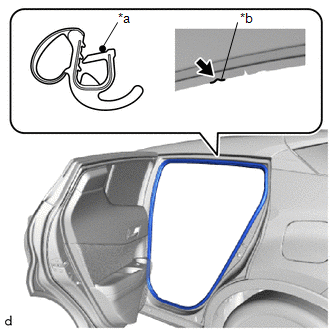
(a) Align the paint mark on the front door opening trim weatherstrip with the mark position on the vehicle and install the front door opening trim weatherstrip as shown in the illustration. Paint Mark:
NOTICE:
HINT: To easily install the weatherstrip, first install the area with the paint mark as shown in the illustration. Then install the part toward the corners and push any excess length into the corners. |
|
2. INSTALL REAR DOOR SCUFF PLATE (w/o Rear Seat Side Airbag)
Click here
.gif)
3. INSTALL REAR DOOR SCUFF PLATE (w/ Rear Seat Side Airbag)
Click here
4. INSTALL REAR SEAT ASSEMBLY
Click here
 Reassembly
REASSEMBLY
CAUTION / NOTICE / HINT
HINT:
Use the same procedure for the RH side and LH side.
The following procedure is for the LH side.
PROCEDURE
1. INSTALL REAR DOOR OUTSIDE S ...

Other materials:
Toyota CH-R Service Manual > Electric Parking Brake System: Data List / Active Test
DATA LIST / ACTIVE TEST
READ DATA LIST
HINT:
Using the Techstream to read the Data List allows the values or states of switches,
sensors, actuators and other items to be read without removing any parts. This non-intrusive
inspection can be very useful because intermittent conditions or signal ...
Toyota CH-R Owners Manual > Using the driving support systems: PCS (Pre-Collision System)
The pre-collision system uses a radar sensor and camera sensor to
detect vehicles and pedestrians in front of your vehicle.
When the system determines that the possibility of a frontal collision with a
vehicle or pedestrian is high, a warning operates to urge the driver to take evasive
acti ...
Toyota CH-R Owners Manual
- For safety and security
- Instrument cluster
- Operation of each component
- Driving
- Interior features
- Maintenance and care
- When trouble arises
- Vehicle specifications
- For owners
Toyota CH-R Service Manual
- Introduction
- Maintenance
- Audio / Video
- Cellular Communication
- Navigation / Multi Info Display
- Park Assist / Monitoring
- Brake (front)
- Brake (rear)
- Brake Control / Dynamic Control Systems
- Brake System (other)
- Parking Brake
- Axle And Differential
- Drive Shaft / Propeller Shaft
- K114 Cvt
- 3zr-fae Battery / Charging
- Networking
- Power Distribution
- Power Assist Systems
- Steering Column
- Steering Gear / Linkage
- Alignment / Handling Diagnosis
- Front Suspension
- Rear Suspension
- Tire / Wheel
- Tire Pressure Monitoring
- Door / Hatch
- Exterior Panels / Trim
- Horn
- Lighting (ext)
- Mirror (ext)
- Window / Glass
- Wiper / Washer
- Door Lock
- Heating / Air Conditioning
- Interior Panels / Trim
- Lighting (int)
- Meter / Gauge / Display
- Mirror (int)
- Power Outlets (int)
- Pre-collision
- Seat
- Seat Belt
- Supplemental Restraint Systems
- Theft Deterrent / Keyless Entry

0.0113