Toyota CH-R Service Manual: Components
COMPONENTS
ILLUSTRATION
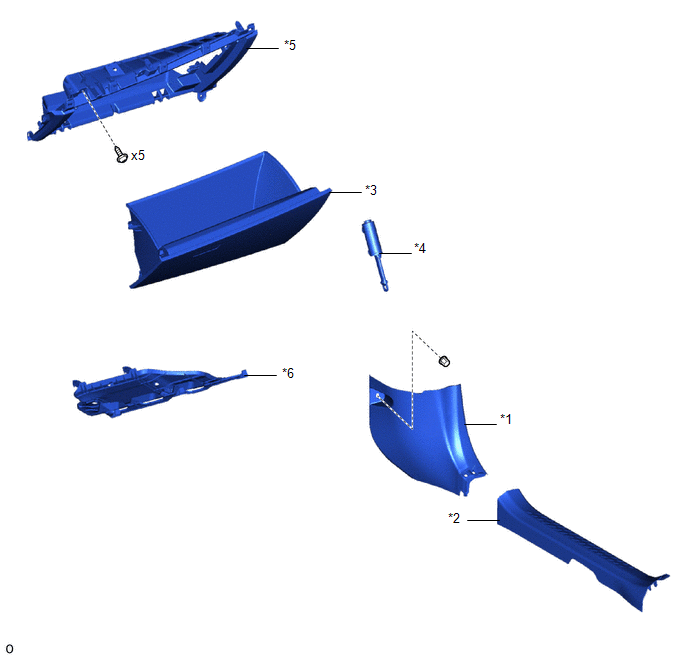
|
*1 |
COWL SIDE TRIM BOARD RH |
*2 |
FRONT DOOR SCUFF PLATE RH |
|
*3 |
GLOVE COMPARTMENT DOOR ASSEMBLY |
*4 |
GLOVE COMPARTMENT DOOR STOPPER SUB-ASSEMBLY |
|
*5 |
NO. 2 INSTRUMENT PANEL LOWER FINISH PANEL |
*6 |
NO. 2 INSTRUMENT PANEL UNDER COVER SUB-ASSEMBLY |
ILLUSTRATION
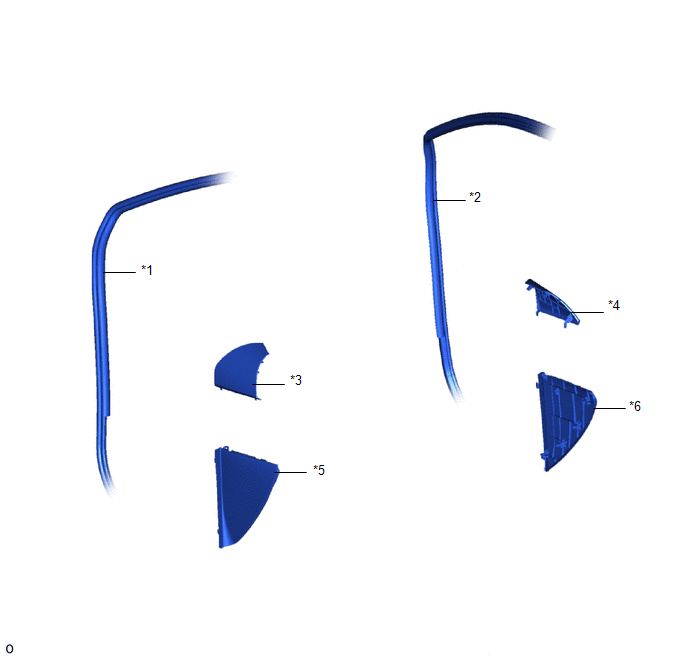
|
*1 |
FRONT DOOR OPENING TRIM WEATHERSTRIP LH |
*2 |
FRONT DOOR OPENING TRIM WEATHERSTRIP RH |
|
*3 |
INSTRUMENT PANEL FINISH END PANEL LH |
*4 |
INSTRUMENT PANEL FINISH END PANEL RH |
|
*5 |
INSTRUMENT SIDE PANEL LH |
*6 |
INSTRUMENT SIDE PANEL RH |
ILLUSTRATION
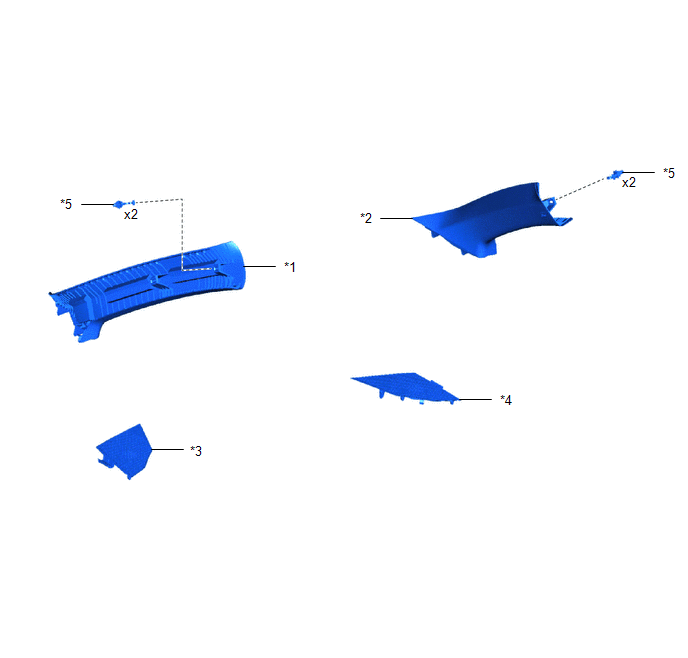
|
*1 |
FRONT PILLAR GARNISH LH |
*2 |
FRONT PILLAR GARNISH RH |
|
*3 |
NO. 1 INSTRUMENT PANEL SPEAKER PANEL SUB-ASSEMBLY |
*4 |
NO. 2 INSTRUMENT PANEL SPEAKER PANEL SUB-ASSEMBLY |
|
*5 |
FRONT PILLAR GARNISH CLIP |
- |
- |
ILLUSTRATION
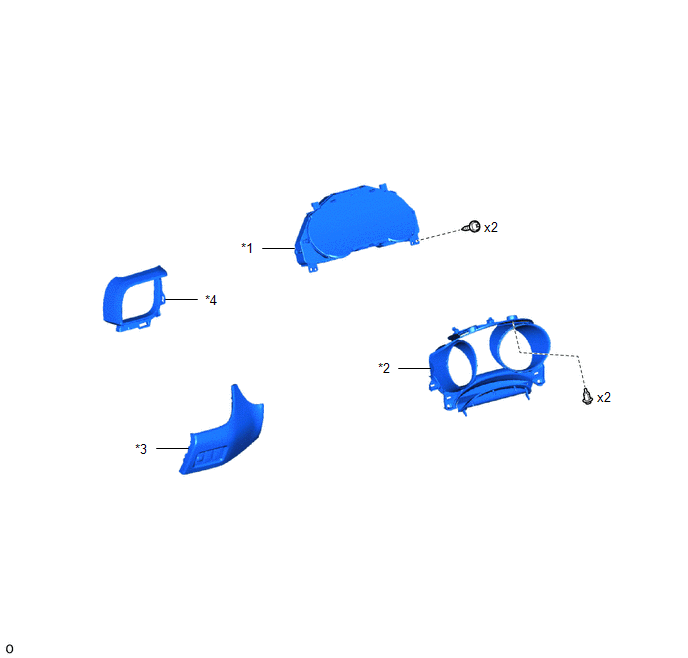
|
*1 |
COMBINATION METER ASSEMBLY |
*2 |
INSTRUMENT CLUSTER FINISH PANEL ASSEMBLY |
|
*3 |
INSTRUMENT CLUSTER FINISH PANEL SUB-ASSEMBLY |
*4 |
NO. 2 INSTRUMENT PANEL GARNISH SUB-ASSEMBLY |
ILLUSTRATION
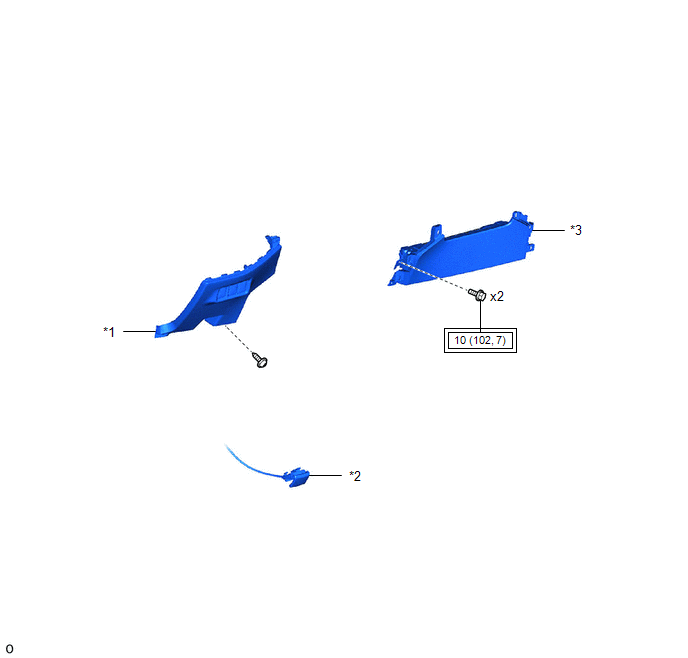
|
*1 |
FUSE BOX OPENING COVER |
*2 |
HOOD LOCK CONTROL LEVER SUB-ASSEMBLY |
|
*3 |
LOWER NO. 1 INSTRUMENT PANEL AIRBAG ASSEMBLY WITH DOOR |
- |
- |
.png) |
Tightening torque for "Major areas involving basic vehicle performance such as moving/turning/stopping" : N*m (kgf*cm, ft.*lbf) |
- |
- |
ILLUSTRATION
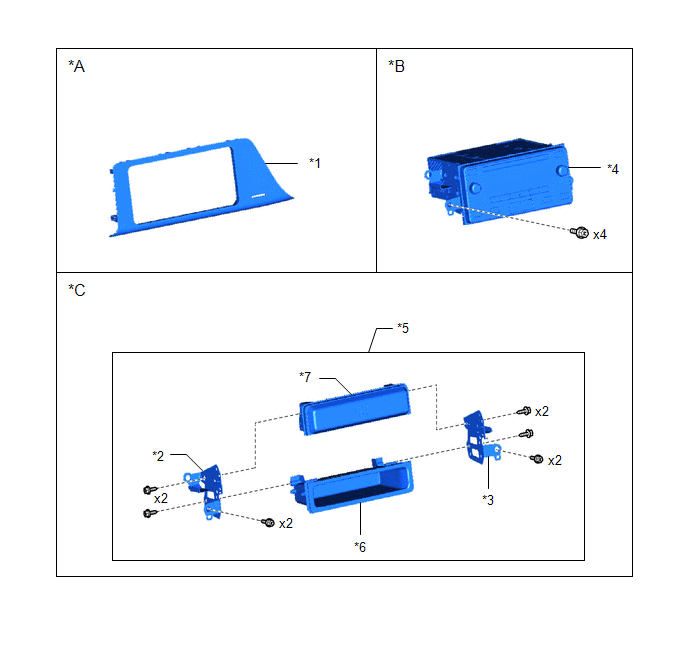
|
*A |
w/o Display |
*B |
w/ Radio Receiver |
|
*C |
w/o Radio Receiver |
- |
- |
|
*1 |
INSTRUMENT CLUSTER FINISH PANEL SUB-ASSEMBLY |
*2 |
NO. 1 RADIO BRACKET |
|
*3 |
NO. 2 RADIO BRACKET |
*4 |
RADIO RECEIVER ASSEMBLY WITH BRACKET |
|
*5 |
STEREO OPENING COVER WITH BRACKET |
*6 |
NO. 2 STEREO OPENING COVER |
|
*7 |
STEREO OPENING COVER |
- |
- |
ILLUSTRATION

|
*A |
for Radio and Display Type |
- |
- |
|
*1 |
RADIO AND DISPLAY RECEIVER ASSEMBLY WITH BRACKET |
- |
- |
ILLUSTRATION

|
*A |
w/ Display |
*B |
w/o Display |
|
*C |
w/ Smart Key System |
- |
- |
|
*1 |
INSTRUMENT CLUSTER FINISH LOWER CENTER PANEL SUB-ASSEMBLY |
*2 |
INSTRUMENT PANEL CENTER REGISTER ASSEMBLY |
|
*3 |
NO. 1 INSTRUMENT PANEL GARNISH SUB-ASSEMBLY |
*4 |
NO. 2 HEATER TO REGISTER DUCT SUB-ASSEMBLY |
|
*5 |
STARTER SWITCH BEZEL |
- |
- |
ILLUSTRATION

|
*1 |
INSTRUMENT PANEL SAFETY PAD SUB-ASSEMBLY |
- |
- |
.png) |
Tightening torque for "Major areas involving basic vehicle performance such as moving/turning/stopping" : N*m (kgf*cm, ft.*lbf) |
.png) |
N*m (kgf*cm, ft.*lbf): Specified torque |
|
*T1 |
for TMMT Made, Type A: 10.5 N*m (107 kgf*cm, 8 ft.*lbf) for TMMT Made, Type B: 10 N*m (102 kgf*cm, 7 ft.*lbf) for TMC Made: 10 N*m (102 kgf*cm, 7 ft.*lbf) |
*T2 |
for TMMT Made, Type A: 8.3 N*m (85 kgf*cm, 73 in.*lbf) for TMMT Made, Type B: 10 N*m (102 kgf*cm, 7 ft.*lbf) for TMC Made: 10 N*m (102 kgf*cm, 7 ft.*lbf) |
ILLUSTRATION

|
*A |
for Radio and Display Type |
- |
- |
|
*1 |
DEFROSTER NOZZLE ASSEMBLY |
*2 |
NO. 1 HEATER TO REGISTER DUCT SUB-ASSEMBLY |
|
*3 |
NO. 1 INSTRUMENT PANEL REGISTER ASSEMBLY |
*4 |
NO. 1 SIDE DEFROSTER NOZZLE |
|
*5 |
NO. 2 INSTRUMENT PANEL REGISTER ASSEMBLY |
*6 |
NO. 2 SIDE DEFROSTER NOZZLE |
|
*7 |
NO. 3 HEATER TO REGISTER DUCT SUB-ASSEMBLY |
*8 |
TELEPHONE AND GPS ANTENNA ASSEMBLY |
ILLUSTRATION
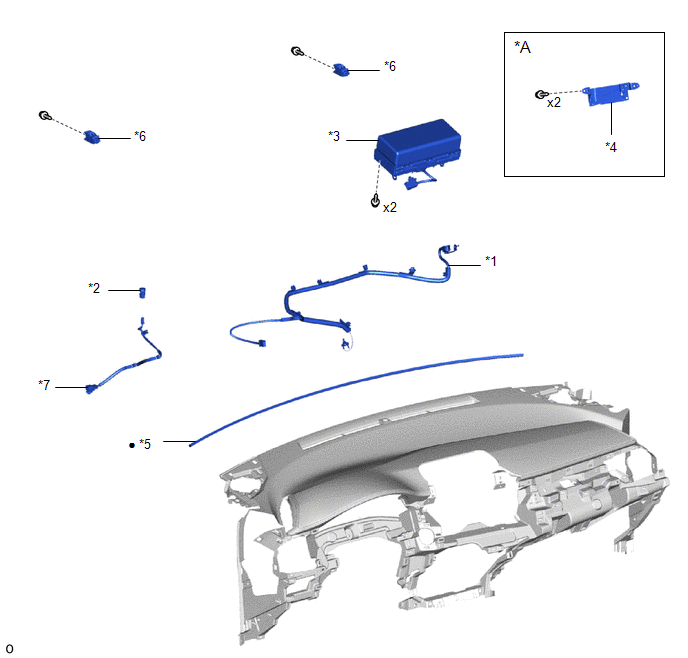
|
*A |
w/ Ion Generator |
- |
- |
|
*1 |
ANTENNA CORD SUB-ASSEMBLY |
*2 |
AUTOMATIC LIGHT CONTROL SENSOR |
|
*3 |
INSTRUMENT PANEL PASSENGER AIRBAG ASSEMBLY |
*4 |
ION GENERATOR SUB-ASSEMBLY |
|
*5 |
NO. 1 INSTRUMENT PANEL CUSHION |
*6 |
NO. 1 INSTRUMENT PANEL PIN |
|
*7 |
NO. 2 INSTRUMENT PANEL WIRE |
- |
- |
|
● |
Non-reusable part |
- |
- |
 Removal
REMOVAL
CAUTION / NOTICE / HINT
The necessary procedures (adjustment, calibration, initialization, or registration)
that must be performed after parts are removed, installed, or replaced during th ...
Other materials:
Toyota CH-R Owners Manual > Driving procedures: Parking brake
A selections can be made as desired from the following modes.
Automatic mode
The parking brake is set or released automatically according to shift lever operation.
Even when in automatic mode, the parking brake can be set and released manually.
Turns automatic mode on (while the vehicle is ...
Toyota CH-R Service Manual > Air Conditioning System(for Automatic Air Conditioning System With Top-mounted
Air Conditioner Pressure Sensor): Initialization
INITIALIZATION
INITIALIZATION SERVO MOTOR
(a) Turn the ignition switch off.
(b) Connect the Techstream to the DLC3.
(c) Turn the ignition switch ON.
(d) Press the A/C OFF switch.
(e) Turn the Techstream on.
(f) Enter the following menus: Body Electrical / Air Conditioner / Utility /
Servomo ...
Toyota C-HR (AX20) 2023-2025 Owner's Manual
Toyota CH-R Owners Manual
- For safety and security
- Instrument cluster
- Operation of each component
- Driving
- Interior features
- Maintenance and care
- When trouble arises
- Vehicle specifications
- For owners
Toyota CH-R Service Manual
- Introduction
- Maintenance
- Audio / Video
- Cellular Communication
- Navigation / Multi Info Display
- Park Assist / Monitoring
- Brake (front)
- Brake (rear)
- Brake Control / Dynamic Control Systems
- Brake System (other)
- Parking Brake
- Axle And Differential
- Drive Shaft / Propeller Shaft
- K114 Cvt
- 3zr-fae Battery / Charging
- Networking
- Power Distribution
- Power Assist Systems
- Steering Column
- Steering Gear / Linkage
- Alignment / Handling Diagnosis
- Front Suspension
- Rear Suspension
- Tire / Wheel
- Tire Pressure Monitoring
- Door / Hatch
- Exterior Panels / Trim
- Horn
- Lighting (ext)
- Mirror (ext)
- Window / Glass
- Wiper / Washer
- Door Lock
- Heating / Air Conditioning
- Interior Panels / Trim
- Lighting (int)
- Meter / Gauge / Display
- Mirror (int)
- Power Outlets (int)
- Pre-collision
- Seat
- Seat Belt
- Supplemental Restraint Systems
- Theft Deterrent / Keyless Entry
0.0104

