Toyota CH-R Service Manual: Replacement
REPLACEMENT
PROCEDURE
1. REMOVE NO. 1 ENGINE UNDER COVER
Click here
.gif)
2. DRAIN ENGINE COOLANT
CAUTION:
- When engine coolant is hot, do not remove the reserve tank cap, air release valve or the radiator drain cock plug.
- Fluid and steam may spray out due to high pressure, possibly resulting
in burns.
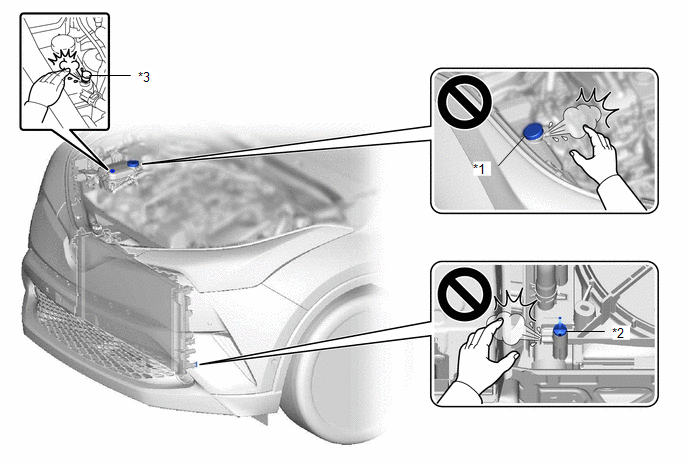
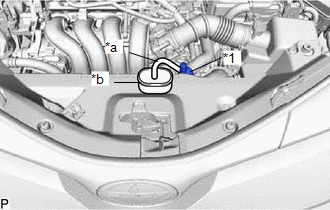
*1
Reserve Tank Cap
*2
Radiator Drain Cock Plug
*3
Air Release Valve
-
-
|
(a) Connect a hose with an inside diameter of 9 mm (0.354 in.) to the radiator drain cock as shown in the illustration. |
|
(b) Loosen the radiator drain cock plug.
(c) Remove the reserve tank cap. Then drain the engine coolant.
|
*1 |
Reserve Tank Cap |
*2 |
Radiator Drain Cock Plug |
|
*3 |
Air Drain Cock Plug |
*4 |
Air Release Valve |
HINT:
Collect the engine coolant in a container and dispose of it according to the regulations in your area.
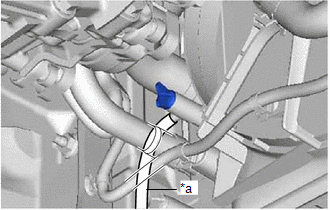
(d) Disconnect the hose from the radiator drain cock.
3. ADD ENGINE COOLANT
|
(a) Using a 6 mm hexagon socket wrench, remove the air release valve from the radiator reserve tank assembly. |
|
|
(b) Connect a hose with an inside diameter of 7 mm (0.276 in.) to the air drain cock plug as shown in the illustration. HINT: Use a container to catch the draining engine coolant. |
|
(c) Loosen the air drain cock plug.
(d) Add engine coolant to the reserve tank assembly until engine coolant overflows from the air drain cock hole. Then tighten the air drain cock plug.
Torque:
1.0 N·m {10 kgf·cm, 9 in·lbf}
(e) Squeeze the No. 1 radiator hose and No. 2 radiator hose several times by hand, and then check the level of the engine coolant.
If the engine coolant level is low, add engine coolant.
|
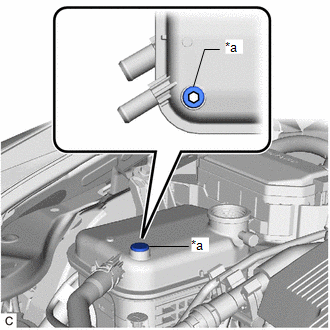
(f) Add engine coolant to the level shown in the illustration. Standard Capacity: 5.7 liters (6.1 US qts, 5.1 Imp. qts) NOTICE: Do not substitute plain water for engine coolant. HINT: TOYOTA vehicles are filled with TOYOTA SLLC at the factory. In order to avoid damaging the engine cooling system and other technical problems, only use TOYOTA SLLC or similar high quality ethylene glycol based non-silicate, non-amine, non-nitrite, non-borate coolant with long-life hybrid organic acid technology (coolant with long-life hybrid organic acid technology is a combination of low phosphates and organic acids). |
|
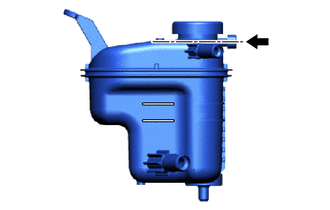
(g) Using a 6 mm hexagon socket wrench, install the air release valve to the radiator reserve tank assembly.
Torque:
2.0 N·m {20 kgf·cm, 18 in·lbf}
(h) Install the reserve tank cap.
NOTICE:
Securely tighten the reserve tank cap as much as possible.
(i) Bleed air from the cooling system.
NOTICE:
- Before starting the engine, turn the A/C switch off.
- Adjust the heater control to the maximum hot setting.
- Adjust the blower speed to the low setting.
(1) Warm up the engine until the thermostat opens. While the thermostat is open, circulate the engine coolant for several minutes.
HINT:
The thermostat open timing can be confirmed by squeezing the No. 2 radiator hose by hand, and sensing vibrations when the engine coolant starts to flow inside the No. 2 radiator hose.
(2) After the engine has warmed up, run the engine using the following cycle for at least 7 minutes: at 3000 rpm for 5 seconds, at idle speed for 45 seconds. (Repeat this cycle at least 8 times.)
(3) Squeeze the No. 1 radiator hose and No. 2 radiator hose several times by hand to bleed air from the system.
When squeezing the No. 1 radiator hose and No. 2 radiator hose:- Wear protective gloves.
- Be careful as the No. 1 radiator hose and No. 2 radiator hose are hot.
- Keep your hands away from the fan.
NOTICE:
- If the coolant temperature gauge indicates an excessive temperature, turn off the engine and let it cool.
- Make sure that the intercooler reserve tank assembly still has some engine coolant in it.
- If the reserve tank assembly does not have enough engine coolant, the engine may overheat or be seriously damaged.
- If the reserve tank assembly does not have enough engine coolant, perform the following: 1) stop the engine, 2) wait until the engine coolant has cooled down, and 3) add engine coolant until the reserve tank assembly is filled to the full line.
HINT:
If the flowing sound of engine coolant can still be heard after bleeding air, perform the following procedure to bleed air again.
- Warm up the engine. (With the engine idling, check that the engine coolant is flowing into the reserve tank assembly.)
- Run the engine at 2000 rpm for 2 minutes or more. (A)
- Leave the engine idling for 2 minutes or more. (B)
- Repeat steps (A) and (B) 4 times or more.
|
(j) After the engine has cooled down, check that the engine coolant level is between the full and low lines. NOTICE: The coolant levels in the compartments inside the radiator reserve tank assembly may differ, but this is not a malfunction. If the engine coolant level is below the low line, add engine coolant to the full line. |
|

4. INSPECT FOR COOLANT LEAK
Click here
5. INSTALL NO. 1 ENGINE UNDER COVER
Click here
 Components
COMPONENTS
ILLUSTRATION
*1
RESERVE TANK CAP
*2
RADIATOR DRAIN COCK PLUG
*3
NO. 1 ENGINE UNDER COVER
-
...
 3zr-fae Drive Belt
Components
COMPONENTS
ILLUSTRATION
*1
FAN AND GENERATOR V BELT
*2
REAR ENGINE UNDER COVER RH
Removal
REMOVAL
PROCEDURE
1. REMOVE REAR ...
Other materials:
Toyota CH-R Service Manual > Front Differential Oil Seal: Replacement
REPLACEMENT
CAUTION / NOTICE / HINT
The necessary procedures (adjustment, calibration, initialization, or registration)
that must be performed after parts are removed, installed, or replaced during the
front differential oil seal removal/installation are shown below.
Necessary Procedure After ...
Toyota CH-R Service Manual > Immobiliser System(w/ Smart Key System): Antenna Coil Open / Short (B2784)
DESCRIPTION
When an open or short circuit is detected in the transponder key amplifier coil
built into the engine switch, the certification ECU (smart key ECU assembly) stores
this DTC. This DTC is also stored as a history DTC.
DTC No.
Detection Item
DTC Detect ...
Toyota C-HR (AX20) 2023-2025 Owner's Manual
Toyota CH-R Owners Manual
- For safety and security
- Instrument cluster
- Operation of each component
- Driving
- Interior features
- Maintenance and care
- When trouble arises
- Vehicle specifications
- For owners
Toyota CH-R Service Manual
- Introduction
- Maintenance
- Audio / Video
- Cellular Communication
- Navigation / Multi Info Display
- Park Assist / Monitoring
- Brake (front)
- Brake (rear)
- Brake Control / Dynamic Control Systems
- Brake System (other)
- Parking Brake
- Axle And Differential
- Drive Shaft / Propeller Shaft
- K114 Cvt
- 3zr-fae Battery / Charging
- Networking
- Power Distribution
- Power Assist Systems
- Steering Column
- Steering Gear / Linkage
- Alignment / Handling Diagnosis
- Front Suspension
- Rear Suspension
- Tire / Wheel
- Tire Pressure Monitoring
- Door / Hatch
- Exterior Panels / Trim
- Horn
- Lighting (ext)
- Mirror (ext)
- Window / Glass
- Wiper / Washer
- Door Lock
- Heating / Air Conditioning
- Interior Panels / Trim
- Lighting (int)
- Meter / Gauge / Display
- Mirror (int)
- Power Outlets (int)
- Pre-collision
- Seat
- Seat Belt
- Supplemental Restraint Systems
- Theft Deterrent / Keyless Entry

0.0109